
Support
1. Talk to us
- Chat: use the support chat on this website or the Support button inside the app. A person on our team answers it.
- E-mail: info@designmastersolutions.com. Tell us your company name and, if something went wrong, what you were doing and what you saw.
- WhatsApp: message our support line at +1 (617) 275-3254.
- Support tickets: signed-in users can open a ticket under Support Tickets in the app and follow the answer there.
2. Getting started
New accounts get a 14-day trial with no card. After you create your company, tap Draw kitchen (or start from a template) and add the walls and cabinets. The starter catalog has standard sizes but no list prices, so a $0 total is expected until you pick one of these:
- Price by the foot (Price by the meter in a shop that works in centimeters): enter the list price per linear foot of base, wall and tall cabinets; each box gets its width × that rate, and your multiplier and markup apply on top. Not sure of yours? One tap fills in the typical list of the manufacturer lines we carry, and a rate far below it asks you to confirm before pricing. In a metric shop there is no typical list to fill in: type your own price per linear meter (see below).
- Load your own price list: in Catalog, open your line and tap Import price list (on a manufacturer's line, Import your prices). Pick a spreadsheet saved as CSV with
skuandlist_pricecolumns, or a PDF or photo of the manufacturer's price list for AI to read. Nothing is saved until you review the rows. Then set your discount under Multipliers: dealer cost is list price × multiplier.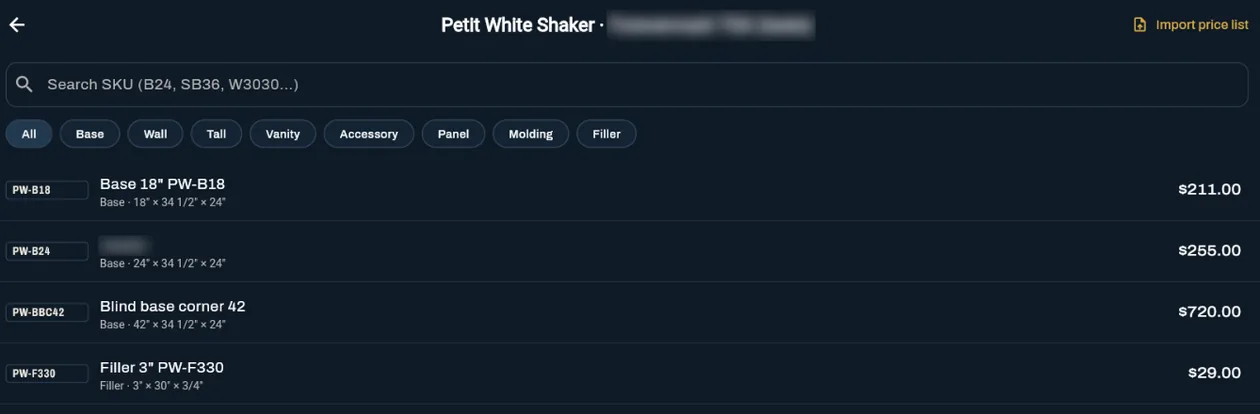
Catalog, your line open: Import price list is at the top right. A box showing $0.00 has no list price yet. 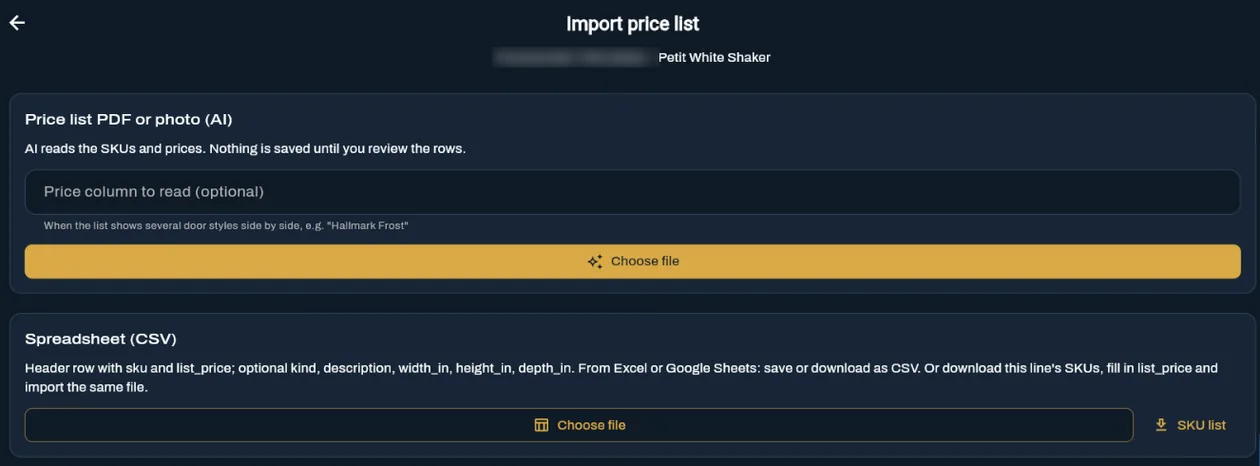
The first Choose file takes a PDF or photo of the price list; the second takes a CSV. No spreadsheet yet? Tap SKU list to download this line's SKUs, fill in list_priceand import that same file. - Use a ready catalog: switch the drawing to a manufacturer catalog that already has list prices, then set your multiplier.
- Material cost: in the drawing's Export menu, enter your price per sheet, edge banding and hardware, add your markup and tap Quote it. The materials open as quote lines.


Working in centimeters? Your company starts in the units of its country: feet and inches in the United States and Canada, centimeters and meters everywhere else. In a metric shop the drawing shows walls in meters and boxes in centimeters, and the starter boxes are named by width, such as BASE 40 or WALL 60. Type lengths as you say them: a bare number is centimeters, and 3.66 m, 3,66 m or 3660 mm work too. To price the starter boxes without a price list:
- In the drawing, under the cabinet line, tap Price by the meter (it may show cut short, as "Price by the me...").
- Type your list price per linear meter for Base cabinets and fillers, Wall cabinets and Tall cabinets, in your own currency, and tap Price the boxes. Each box costs its width × that rate, and your multiplier and markup apply on top. The rate is for one meter of cabinets, not for one box: at 400 per meter a 60 cm base lists at 240. A rate under 50 per meter asks you to confirm, because it usually means the price of one box or one centimeter was typed.
- Tap Price this layout to see the total, then turn it into a quote.


Wrong units? The company owner, or anyone allowed to edit the company, opens Settings, Preferences, Units & Currency and changes Measurement unit or Currency. The change is for the whole company: drawings, quotes and PDFs follow it, and nothing you already drew changes size.
Contractor pricing: a builder or contractor who buys from you often can have their own price. Open the client in Clients, or the builder's company in Accounts, and set Default discount (%). Every new quote for that client starts with it, and so do the totals from Price this layout and Compare lines in the drawing. A discount on the client wins over the one on the account.
When the total looks right, take the quote from the homeowner's yes to the manufacturer:
- Send it: on the quote, tap Send Quote. Send to Client emails the quote, and the client reviews it, accepts or declines online; if they do not answer in a few days, a reminder goes out on its own. Share Link gives you a link and a ready message to text instead.
- Get the yes: the quote turns Accepted when the client accepts, and if you ask for a deposit they pay it online after signing. Client paid you by check or cash instead? On the quote, tap Record Manual Deposit and it counts the same. Agreed in person? Mark it accepted yourself.
- Order the boxes: tap Create Order. Items and prices are locked and a paid deposit counts toward the balance. In Manufacturer order, add the distributor e-mail, export the box list as PDF or CSV (opening it in Excel on Windows? pick CSV for Excel, so inch marks and accented names show right) and tap Mark as ordered. When the truck arrives, Check delivery box by box and Send claim for anything missing or damaged.
- Changes after the yes: an accepted price is locked, so write the changed quote as a new one for the same project and tap Replace Accepted Quote on it. The order is rebuilt from the new lines, the old quote shows as superseded, and a deposit already paid carries over or is refunded, your choice.
Before you price, the drawing can do more of the work for you:
- Fill walls places the line's base and wall cabinets on every wall; then drag a box to move it.
- Design checks compares the layout with the NKBA kitchen guidelines (aisles, landing areas, clearances) and lists what to look at. It warns; the decision stays yours. What each check measures.
- Moldings & countertop (in the drawing's side panel; on a phone, scroll below the plan) measures the job as you draw: crown, light rail and toe kick by the stick, the countertop in square feet with each piece and sink cutout, the exposed edge and the backsplash (none, 4″ or full height). To price the top, pick your rate in Countertop rate (per sq ft); no rate yet? Add a countertop rate saves your price per square foot right there (Catalog, Labor edits it later): Price this layout then adds the countertop and backsplash area at that rate. Your stone shop gets the rest: Countertop sheet draws every piece to scale with the sink setback and edge profile, and Send to fabricator e-mails the PDF; the fabricator's address is remembered for the next job.
- Export gives you the shop files: Cut list (.csv) (turn on Face frame construction for framed boxes: stiles, rails and mullions, doors 1/2″ over the openings), Cutting plan (.pdf) on your own Sheet size, thickness and kerf, the 3D model and more.
Once the boxes are on site, close out the job from its page:
- Keep the fixes: in the job's menu, open Punch list and tap Add item for what is left after the install: a door that rubs, a scratch, a missing filler, with a photo. When it is done, tap Mark fixed.
- Get the install signed: if your company uses install sign-offs (Settings, Install Sign-Off Templates), completing an install activity on the calendar offers Sign Sign-Off. The customer signs on your screen, and open punch list items are listed on the document.
- Bill the balance: in the job's menu, tap Generate Invoice. On the invoice, Record Payment notes money you took by check or cash, and the paid deposit is already counted. If you use QuickBooks, Export to QuickBooks sends it there.
Use Claude or ChatGPT? Connect your account and ask it for a kitchen estimate or your open quotes. Our guides cover measuring a kitchen, SKU codes, filler strips and pricing per linear foot.
How do I add an island and see the kitchen in 3D?
- Open your project and find Kitchen drawing. Tap Edit drawing. If there is no drawing yet, tap Draw the kitchen and add a wall first.
- In the editor, find Islands & peninsulas. On a phone or tablet, scroll below the plan, elevation and wall controls. Tap Add island.
- Select Kitchen side, then choose the cabinets from the catalog to place on that side. Adding the island alone does not fill it with cabinets. Use Size and position (the pencil) to set its dimensions, Rotate 90° to turn it, or drag it in the plan to move it. Check the passage warnings before continuing.
- Tap Save layout and return to the project. In Kitchen drawing, tap View in 3D / send to client. If that button is not visible, open More on the same card.
- In 3D, drag to turn, pinch or scroll to zoom, and double tap to reset the view. Corner view and the wall buttons change the viewpoint. Opening the 3D view does not send anything to the customer.
For a peninsula attached to a wall, select that wall and use Add peninsula instead of Add island. To put cabinets on the back of an island, set a nonzero seating-side cabinet depth in Size and position, then select Seating side and add its cabinets.
How do I get quote requests without a website?
In your quote settings, open Quote Widget. Under Quote request link tap Copy link and paste it where your customers already find you: your Google Business Profile, your Instagram bio, a text message or an e-mail signature. It opens the same request form the website widget shows, and every request lands in your app as a new project with the homeowner as the client. The quote widget is part of the Pro plan.
3. Billing
Plans and prices are on the pricing section. To change or cancel your plan, open Subscription in the app. A plan bought in the App Store or Google Play is managed in that store's subscriptions page; a plan bought on the web is managed from the app's billing portal. You keep access until the end of the period you paid for.
What happens when the 14-day trial ends?
Nothing is deleted. The company moves to the Free plan: 1 user, up to 3 quotes a month, and quote PDFs carry the Cabinet Project brand. Invoices, the calendar and catalog import become read-only. Subscribe in the app (Subscription) and everything unlocks again where you left it. We email you halfway through, 2 days and 1 day before the trial ends, and on the day it ends.
4. Delete your account
You can delete your account inside the app, on any device:
- Open Settings and tap your profile.
- Tap Request account deletion and confirm.
Your account is deleted 30 days after the request. Until then you can cancel it from the app or from the link in the confirmation e-mail. The company owner can also delete the whole company, with all of its clients, quotes, orders and files, under Settings, Company, Request company deletion, with the same 30-day window. If you can no longer sign in, e-mail info@designmastersolutions.com from the address on the account and we will delete it for you.
Deleting removes your personal data and, for a company, its job data. We keep only what the law requires us to keep, such as billing records, as described in the Privacy Policy. Cancel any App Store or Google Play subscription in the store as well; deleting the account does not stop a store from billing.
5. Company
Cabinet Project is made by Design Master Solutions LLC, Yarmouth, MA 02664, United States. E-mail: info@designmastersolutions.com. See also the Terms of Service.